Sunday, 30 June 2013

Holiday Duty Free; Mac, Urban Decay

Hello, I'm back from my holidays with a few beauty essentials in tow. I contained myself quite well i thought, considering i was wandering around Manchester Airport at 4.30am half asleep.


My first thought was duty free, everybody loves duty free and not paying tax, especially when most beauty products are rather expensive. So first stop was the Mac counter, no mithering staff giving me the eye, just myself, I was like a kid in a candy store, powders, lipsticks, foundation, concealer... yes i checked out everything for 35 minutes, poor Marc was pulling his hair out. But in the end I settled for 4 things;

Mineralize Concealer - Shade NW15 (warmer than my foundation which is NC15)
Bronzing Powder - Matte Bronze
217 Blending Brush - Perfectly Fluffy
Brush Cleaner - Holy Grail

Concealer is not really my forte, I dont feel as though my skin needs extra coverage after foundation, but i've always wanted to try something from the mineralize range at mac and thought why not try something different, so i opted for a concealer. Funny thing was i picked up the shade I am normally at home, and forgot that my skin changes colour obviously tans therefore I have not had chance to try this out yet. The formula looks rather creamy, and quite thick but I will let you know how I get on with it.

The bronzer was something that I have wanted to try for a while from Mac, but lately it was a toss up between Nars Laguna bronzer or Macs Matte Bronze, so to save the money I took a dive and went for Mac's. I can honestly say I love this bronzer, its not too dark for my skin or muddy looking, its easy to contour with, and very easy to blend. I can actually say I have wore this bronzer everyday for the past 2 weeks since I picked this up and I do consider this to be a permanent statement in my makeup bag.

The 217 was a brush I had been contemplating on for a while, something I didn't think i personally needed as I have hundreds of blending brushes, over exaggeration but I find myself to be rather loyal to my sigma fluffy brush and my real techniques. But this brush is an over talked about youtube beauty blogging sensation and therefore I thought why not see what the hype was about, especially for a fraction of the price. I have only used this brush a couple of times but feel as though this will in time become my best friend, its really soft when blending, and with the bristles being white it is alot easier to see how much product is on the brush when blending and mixing colours.

Lastly from the airport was the brush cleaner, just another refill. I use this cleaner every time i clean my brushes, and find that it does the job so why stray anywhere else, I might aswell stick with my reliable product.


Then whilst we were on the plane i spotted the Naked 2 Palette for £30 which I thought was a rather good price, unlucky  for me I had forgotten most of my eye shadows, and the palette was sold out on the plane. However, on the way home Marc (whilst i was sleeping) spoilt me and bought me the palette, which I will be doing a review with swatches next week, so keep a look out for that.


What are your favourite duty free purchases? Or you holiday essentials, let me know in the comment section below.


Friday, 28 June 2013

Ebay Wishlist #3


Do you have any recommendations for fashion bargains? Leave your websites below and I will make sure to check them out.


Thursday, 27 June 2013

Majorca 2013


Demi Lovato Heart Attack (music video) inspired look

Hello blogging friends, some of you might be aware of my fascination with Demi Lovato. I really enjoy her music, her films and just the whole personality of her so on her new video I decided to try and recreate the stand out black eyes and the nude lips.


So here goes...

To start off I used benefits porefessionals to prime my skin, this is new to me and I only have the tester size at the moment, but I really like the texture and the general feel of this primer on my face. I waited for that to sink in for a couple of minutes and then went on to use my Rimmel Wake Me Up foundation in the shade ivory to try and recreate the dewy glowy skin that Demi has in the picture. I applied this foundation with my real techniques expert face brush, and then powdered the top of my forehead and the front of my nose with the Rimmel Stay Matte powder in the shade translucent.

On to the eyes...

The eyes are the main focus on Demi's statement look and I took gunmetal from the naked palette and covered the lid of my eye, making sure the eyeshadow was pretty dark, I then started to blend at e edges to create the black flick I used creep from the naked palette mixed with the noir from the sleek Oh so special palette! I love these two mixed together, I kept on adding more of the noir to get the thick dark look, and blended each time using my mac 217 to get rid of any harsh lines around my eyes. I then lined my upper lash line with Topshop Khol liner in black, and applied the same eyeliner to my bottom lashes, smudging the bottom liner with a real techniques crease brush. I then used the accent brush to apply the colour gunmetal under my eye, and again blended this out with a Mac 217.
For my lashes, I first curled my lashes then applied a layer of the Benefit They're real mascara, waited for that to dry and then applied a pair of false eyelashes, the eyelashes are red cherry lashes, but I can't remember which ones, as silly me lost the packet.


That was it eyes done, although I was left with quite a bit of shadow fall down under my eyes, from the heavy dark colours so I then wiped that away with a cotton pad and applied some more foundation making sure I stayed away from the under eye area. Once the foundation was reapplied I then took my Collection lasting perfection concealer in the shade light 2 and applied this to any blemishes such as on my chin or under my eye area. After this had been blended I then applied my nars Laguna bronzer to my cheeks using the real techniques contour blush, and blending it out to give a subtle glow. I then applied my Benefit Sun Beam highlighter under my brow bones and on the tops of my cheeks, leaving my eyebrows to be filled in using Mac Mystery eyeshadow and a Rimmel dark brown eyebrow pencil to create Demi's striking brows.
Once they were filled In I set them using the MUA clear brow gel and powdered my face using the Mac MSF in natural.

Onto the lips, I decided to keep them nude and used Mac Passion Blossom, which i believe has been discontinued, but i love it for a subtle glossy finish.

Any looks you'd like me to try?


Wednesday, 5 June 2013

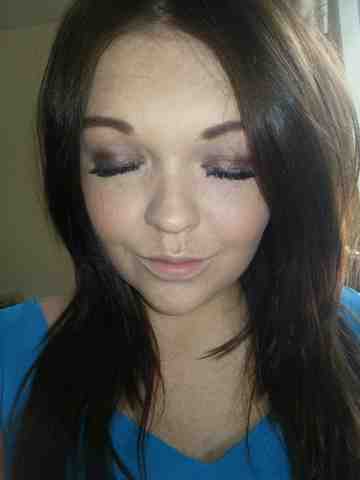
OOTD: Gold smokey eyes


Saturday night was date night for me and the other half, so I thought why not glam things up a little bit and switch up my makeup :) so I did plus some false lashes.

To start off I prepped my skin with Mac's prep and prime, I find this works great as a base for my foundation, as moisturiser is sometimes too flashy on photos for nights out.
http://www.maccosmetics.co.uk/product/160/967/Products/Face/Primer/Prep-Prime-Skin/index.tmpl

After I've prepped my skin I then used Mac studio fix fluid in the shade NC15, this is the perfect match for my skin, and Is a medium coverage but is build able by applying numerous layers.

Then I went on to use my Rimmel Stay Matte pressed powder in the shade translucent, and I applied this by using a real techniques buffing brush, as I find it easier to apply to my t-zone areas, and I didn't want a matte coverage over my whole face.

Next thing was bronzer, I've recently ran out of my Nars Laguna bronzer and I'm holding out to purchase it at the airport so I used a MUA mosaic bronzer instead, I'm not a huge fan but has to work with the tools I had. So I swirled my real techniques contour brush around the mosaic bronzer and applied it to my cheek bones and upper cheeks.

Sticking with the highlight and contour theme I then used my beloved Benefit Sun Beam highlighter underneath my brow bone, and on the tops of my cheek were I blended it out with my finger towards my hair line. 

I then went on to fill in my brows, because my brows are naturally blonde I tint them to a medium brown but always find that filling them in defines them more, so I took my MUA Pro Brow Palette and used the darkest shade, starting from the middle of the brow towards the end and then from the front to the middle, using the least amount of powder at the front.

For the main thing, those golden eyes I started by applying Mac's paint pot in the shade indianwood all over the lid with my ring finger, and then took the real techniques eyeshadow brush and the colour wrapped up from the Sleek oh so special! Palette and applied it to the whole of the lid, lightly so that the paint pot was still able to be seen but only slightly. From the same palette I then took the shade gift basket and applied it to the outer of my eye, blending with my Mac 217 towards the middle of the eye to create a small smoked effect, I also took this colour under the first half of my eye and blended it out to create a soft effect, I also then took the colour noir from the sleek palette and placed that under my eye starting from the outer corner and meeting gift basket at the centre of my eye.

To finish my look I then applied a pair of Eylure eyelashes number 101 my all time favourite false lashes to give my eyes that extra pop.

The sleek palette that created this look has been reviewed on my blog previously and can be found here.